Exodontics
Also known as: Tooth Extraction
Indications for Tooth Extraction
- Severe periodontal disease (mobility, furcation exposure, periodontal probing depths)
- Complicated crown fracture (pulp exposed)
- Worn tooth with pulp exposure
- Crown root fracture
- Odontoclastic resorptive lesion
- Caries lesion
- Non-vital tooth
- Persistent deciduous teeth
- Teeth involved in a jaw fracture
- Unerupted teeth causing pathology
- Teeth causing malocclusions
- Supernumerary teeth
- Chronic gingivostomatitis
Patient Preparation
- General anaesthesia – a cuffed ET tube and throat pack are recommended to secure the airway. Local anaesthesia should also be considered.
- Pre-emptive analgesia.
- Perioperative antibiotics should be given in selected cases only. These include debilitated animals, immuno-compromised animals, animals with severe local or systemic infection, animals with organ disease or endocrine disorders.
- Scale and polish all teeth prior to performing any extractions. Tooth extraction, by whatever technique, is a surgical procedure and should be performed in as clean field as possible. The surgical site should also be irrigated with a chlorhexidine based mouthwash.
- Pre-operative radiographs should be performed. Radiographs will enable the surgeon to assess any abnormal root morphology and the integrity of the surrounding bone. Post-operative radiographs can be taken to ensure complete tooth root removal.
Techniques
Open (surgical) or closed (non-surgical). The use of technique depends on the operator’s preference, tooth morphology and type of disease present. The choice of technique used may depend on a pre-operative radiograph which is always recommended prior to an extraction.
Non-Surgical or Closed Technique
This technique is used for all single rooted teeth or teeth that have been sectioned into individual roots.
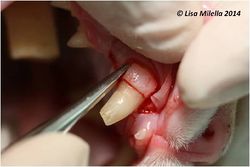
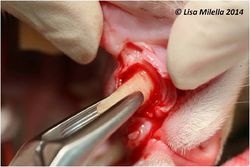
The gingival attachment is cut around the whole circumference of the tooth using a no.11 scalpel blade or a sharp luxator. Either a luxator or elevator of appropriate size is then inserted into the periodontal ligament space to cut the periodontal ligament fibres. Once some space is created between the tooth and the bone, an elevator is used to work circumferentially around the tooth applying some apical and rotational pressure at an acute angle to the tooth root. Pressure should be applied for 10 seconds at a time to break down the periodontal ligament fibres. It is important that the tooth is not levered. Once the tooth is mobile it can be delivered from the socket using either fingers or extraction forceps. It is important to use extraction forceps correctly to avoid root fracture. The forceps should be applied as low down the root as possible. The forceps are initially used in a rotational manner to break down any remaining fibres and when the tooth is able to rotate in both directions, the tooth can gently be pulled from the socket.
To section teeth into individual roots a tapered fissure friction grip bur on a high speed handpiece with water-cooling should be used. A small diameter bur should be used. The furcation needs to be identified and as a general rule, lies below the main cusp of the crown. Once the furcation is identified the tooth should be sectioned from the furcation towards the cusp, from the buccal to lingual/palatal aspect of the tooth. Care should be taken not to damage the gingival attachment at the furcation. To check that the tooth has been adequately sectioned, place an elevator between the two sections of the tooth and gently rotate – both parts of the crown should move independently.
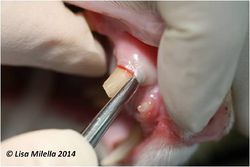
Cutting the periodontal ligament fibres using either a luxator or elevator of appropriate size.
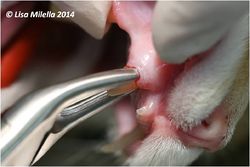
Removing a tooth from its socket using extraction forceps.
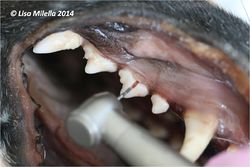
Sectioning a tooth from the furcation towards the cusp, from the buccal to lingual/palatal aspect of the tooth during an extraction.


Surgical or Open Technique


A surgical or open technique is an extraction technique involving raising a flap of tissue to remove bone that forms part of the socket, to allow access to the root and facilitate its extraction.
Indications
This technique should always be used for extraction of canine teeth, but the same principles can be applied to extraction of any tooth in the mouth. A surgical extraction technique is also used for retrieval of root remnants and if any abnormal tooth morphology exists. It may also be the surgeon’s preference to use a surgical technique if multiple adjacent teeth need to be extracted.
All oral surgery principles should be strictly adhered to when performing surgical extractions:
- The flap should be of sufficient size to close the defect.
- The base of the flap should be wider than the free margin in order to preserve the blood supply to the flap.
- The edges of the flap need to be supported by underlying bone at the time of closure to prevent collapse of the flap into the bony defect.
- Avoid adjacent structures such as the neurovascular bundles exiting the infraorbital foramen.
- Avoid any tension on the flap when suturing by making periosteal releasing incisions.
- Use a fine, monofilament absorbable suture material.
Intraoral Suture Materials
Physical and Biological Requirements for Intraoral Suture Materials:
- Fast absorption with minimal tissue reactivity
- Good short-term tensile/knot strength with sutures of small diameter
- Minimally plaque retentive
- Low capillarity and fluid absorption
- Knots with good security and without injury to the soft tissues
- Low tissue drag
- High pliability for favorable handling in confined areas
Size 5-0 and 4-0 poliglecaprone (Monocryl) is currently the most compatible suture material for intraoral use. It has rapid absorption times that approximate the optimum time for removal of nonabsorbable suture materials and good tensile strength, knot security, smoothness and minimal tissue reactivity. Monocryl loses 20 to 30% of its original tensile strength after 2 weeks, and is completely absorbed by hydrolysis in 90 days.
Needles for use in oromaxillofacial surgery are of the swaged-on variety which reduce tissue trauma. The reverse-cutting needle which has a flat surface along its inner curvature prevents the inadvertent cutting of tissue and is the most commonly used needle in oromaxillofacial surgery. Tapered point needles are round in cross-section, and result in less tissue damage than cutting point needles, but are poorly suited for use in tough tissues, such as gingiva. Tapercut needles combine the cutting action of the reverse-cutting needle at its tip and the round body of the taper for atraumatic passage through delicate tissues. The tapercut needle is recommended for use in mucogingival surgery.
Types of Gingival and Mucogingival Flaps
An envelope flap is a gingival flap (i.e. not extending apical to the mucogingival junction) created by making a sulcular incision and elevating some of the attached gingiva on the lingual and buccal aspects and no vertical releasing incisions. An extended envelope flap is useful for extraction of several adjacent teeth. They are mucogingival flaps, i.e. incisions extend apical to the mucogingival junction. Flaps used for extraction procedures are full-thickness flaps that also include the periosteum.
- A triangle flap is a mucogingival flap consisting of a sulcular incision and one vertical releasing incision.
- A pedicle flap is a sulcular incision with two vertical releasing incisions, this flap provides the best exposure.
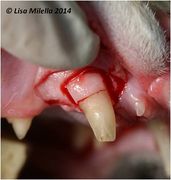
Technique for Surgical Extraction of an Upper Canine
- A pre-extraction radiograph of an upper canine tooth shows the length of the root. As a general rule the apex of the canine tooth finishes at the mesial root of the second premolar. This should be taken in to consideration when designing the flap. The flap should enable unimpeded access to the whole root if necessary.
- Vertical releasing incisions are made between the upper canine and lateral incisor rostrally and at the mesial line angle of the second premolar. The blade is also run in the gingival suclus around the tooth, being careful not to perforate through the gingiva. The vertical releasing incisions should extend beyond the mucogingival junction (the junction between attached gingiva and the alveolar mucosa). The vertical releasing incisions can be slightly divergent to allow adequate blood supply to the flap. The vertical releasing incisions should also be made so that there is bone support for the sutured wound and not lie over a void.
- A sharp periosteal elevator is used to raise a full thickness mucoperisoteal flap. The elevator is positioned at an angle to the bone –if too flat, accidental perforation of the flap can occur. The tissue is tightly adhered at the mucogingival junction and care must be taken not to perforate the flap here. The flap raised should give good exposure to the alveolar bone overlying the tooth root.
- Using a high speed water cooled round bur, create a gutter on either side of the canine tooth root. Some overlying buccal bone can be removed to adequately see the mesial and distal edge of the tooth root. The gutters should be half the width of the tooth root and extend up to 2/3 of the length of the root. The gutters are then connected on the buccal aspect so that the bone plate overlying the root is removed together with the root.
- A dental elevator is positioned in the groove created on either the mesial or distal aspect of the tooth. Elevators should not be used on the palatal aspect of the upper canine tooth to avoid iatrogenic oronasal communication. The elevator should be rotated slowly to tear the periodontal ligament attachment. Tension should be held for about 10 seconds to allow the ligament to tear. Move the elevator to the opposite groove and repeated the motion. Repeat until the tooth starts to loosen. When the tooth is loose, position the extraction forceps as far apically as possible and rotate the tooth along its long axis, pulling gently at the same time. The extracted tooth should be checked to ensure that the whole root has been extracted (a post op radiograph should be taken if any doubt).
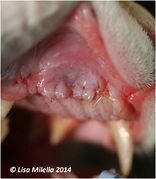
- The empty socket should be debrided if there is any granulation tissue or debris. Check the socket for any loose bone fragments. The edges of the socket should then be smoothed using either a diamond coated bur or with ronguers. The extraction site can be lavaged with lactated ringers solution to remove any remaining debris. The air-water syringe on the dental machine should not be used as air may cause an embolism or emphysema and water is cytotoxic to connective tissue cells.
- The flap is then replaced and sutured in position using a monofilament absorbable suture material, using a simple interrupted suture pattern. The flap should be sutured with no tension. Releasing incisions can be made in the periosteum on the underside of the flap to release tension if necessary. Care must be taken not to perforate the flap.
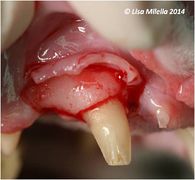
The flap raised should give good exposure to the alveolar bone overlying the tooth root.
Some overlying buccal bone can be removed to adequately see the mesial and distal edge of the tooth root. The gutters should be half the width of the tooth root and extend up to 2/3 of the length of the root. The gutters are then connected on the buccal aspect so that the bone plate overlying the root is removed together with the root.
A dental elevator is positioned in the groove created on either the mesial or distal aspect of the tooth.
When the tooth is loose, position the extraction forceps as far apically as possible and rotate the tooth along its long axis, pulling gently at the same time.
The flap is replaced and sutured in position using a monofilament absorbable suture material, using a simple interrupted suture pattern.


Applying the Principles to the Lower Canine Tooth
The basic principles described above are used for the mandibular canine with the following exceptions – Care should be taken when placing the vertical releasing incisions and raising the flap to avoid damaging the inferior alveolar blood vessels and nerve exiting the middle mental foramen. A longer releasing incision can be made rostrally creating more of a triangular flap.
Dental elevators should not be placed directly mesially and distally but rather on the mesiolingual and distolingual aspects of the tooth. This is to avoid fracture of the rostral mandible.
Maxillary Fourth Premolar Tooth Extraction
- A pedicle flap provides optimum visibility for extraction of the maxillary fourth premolar tooth.
When making a vertical releasing incision mesial to the maxillary fourth premolar tooth, care must be taken not to incise through the infraorbital neurovascular bundle. A perpendicular rather than divergent incision is less likely to damage the infraorbital vessels and nerve.
- Once the flap has been raised, remove 1-3mm of bone from the alveolar margin overlying the buccal roots and identify the furcation.
- Section the tooth into 3 individual roots. Use a tapered bur on a high speed hand piece, beginning at the furcation and progressing coronally.
- Each root is then gently luxated and extracted individually.
Maxillary First Molar Tooth Extraction
- The 2 buccal roots are long and slender when compared with the palatal root, and are therefore easily fractured.
- With the patient in dorsal recumbency, a sulcular incision is made and extended 1-2 mm mesially. Taking care not to damage the zygomatic papilla, a vertical releasing incision can be made into the mucosa, creating a triangle flap.
- Following sectioning the palatal root may be extracted first; it is shorter and more conical, making its extraction less challenging.
- Following sectioning and partial alveolectomy, a luxator is introduced on the mesial and distal aspects of each of the buccal roots, taking care not to penetrate into the orbit. An elevator may be carefully employed once luxation has resulted in significant mobility of the 2 buccal roots.
- Minimal tractional and rotational forces should be applied with extraction forceps for final delivery of each buccal root.
- If a vertical releasing incision was made, it should be sutured. Otherwise, tension-free closure of the gingiva may not be possible without extensive flap development, and the site may be left to heal by second intention.
Maxillary Second Molar Tooth Extraction
- Following appropriate radiography it may be evident that the 3 roots of the maxillary second molar are fused, making sectioning unnecessary for extraction of the resulting short, conical tooth. In this case, the tooth may be removed intact with an elevator.
- If the roots are not fused, they may be curved and therefore fracture easily. If visibility allows, the tooth may be sectioned as described for the maxillary first molar, and each root removed separately.
- Luxators and elevators must be used with extreme caution, as there is often a minimal amount of bone distal to this tooth, and inadvertent dorsal slippage of a luxator can easily lead to orbital trauma or laceration of the maxillary artery.
Mandibular First Molar Tooth Extraction
- This is a very large tooth, the roots of which are often adjacent to the mandibular canal.
- Extraction of a periodontally-sound mandibular first molar tooth is difficult, and may result in iatrogenic fracture. In addition, dilacerated roots may make extraction even more challenging, with an increased risk of root or mandibular fracture.
- Create a triangle mucogingival-periosteal flap and remove up to 50 of the buccal alveolar bone using a large round bur in a water cooled high speed hand piece.
- Section the tooth into 2 individual roots using a tapered fissure bur
- Using a suitable sized elevator, work around the whole circumference of each root.
- Once mobile, use extraction forceps to gently finish the luxation and deliver the tooth.
Complications of Extractions
| Complication | Cause and Avoidance |
|---|---|
| Tooth Fracture (crown/root/both) | Incorrect technique – careful use with elevators and luxators
Extraction forceps should not be used before the tooth is adequately loosened. |
| Oronasal Communication | May be due to infection or iatrogenic damage – avoid excessive force during the extraction. |
| Jaw Fracture | Pre-operative radiographs should be taken to assess bone loss in advanced periodontal disease
Incorrect technique (placement of luxators and elevators especially associated with lower canine) must be avoided. |
| Haemorrhage | Accidental damage to neurovascular bundle during surgery
Haemorrhage may occur as a result of a root fracture Pre-existing disease (identified before surgery) if possible. |
| Displaced Tooth Fragments | Avoid downward force in cats as the root fragment may be displaced into the mandibular canal
Avoid excessive force on the palatal root of the upper carnassial in dogs to avoid pushing the root into the nasal turbinates. |
| Thermal Bone Damage | Adequate cooling of high speed bur when used. |
| Emphysema | Incorrect use of the highspeed hand piece. Avoid blowing air into soft tissue or bone. |
| Soft Tissue Injuries (gingiva, tongue, frenulum, lip, eye) | Use spatulas to avoid accidental damage when using the high speed bur. Controlled force when using elevators and avoid slippage by correct holding of instrument and stabilization of the patient’s head. |
| Wound Breakdown | Avoid tension when suturing in the mouth. Periosteal releasing incisions can be made on the surface of mucoperiosteal flaps to release tension or increase the size of the flap by increasing the realeasing incisions to relieve tension. Careful flap planning prior to extraction is necessary. |
Special Considerations for Deciduous Tooth Extraction
Indications for extraction of deciduous teeth may be due to malocclusion in puppies or because of persistent deciduous teeth. In a puppy less than 16 weeks of age, the permanent crown is only just developing and calcifying and immense damage can be done to this developing tooth if the luxator/elevator is positioned too far down the root or in the incorrect place. The length of the root of the deciduous tooth is usually about 2-3 times the length of the crown so a surgical extraction technique is used if the root is not resorbing.
A dental radiograph should be taken to assess where the permanent tooth bud is positioned or in the case of persistent deciduous teeth, whether the root is being resorbed or not. With resorption, there is loss of the density of the dentine and periapical resorption. In the cases where the root is being resorbed, a simple, nonsurgical extraction technique as detailed above can be used.
- In young puppies or persistent deciduous teeth where the root is not being resorbed, raise a small mucoperiosteal flap –use a no.11 scalpel blade to make the releasing incisions then a periosteal elevator to raise the flap
- Use a small round bur to remove buccal bone. Care must be taken not to damage the root of the permanent or adjacent teeth
- Use a small elevator (eg.superslim which is 1.3mm width) to gently luxate the tooth taking care not to position the elevator in a position where the permanent tooth could be damaged. If extracting the mandibular deciduous canines, no instrument should be placed on the lingual (inner) aspect of the tooth as this will damage the permanent developing mandibular canine (lower arrow) and probably also the 3rd incisor (top arrow). If extracting maxillary deciduous canines take care placing any instrument on the mesial (front edge) aspect as the permanent tooth bud develops in front of the deciduous.
- Gently rotate and luxate the deciduous tooth. Once there is some mobility, use extraction forceps with a small beak (pattern 76N) in a rotational manner to break down any remaining fibres prior to the tooth being lifted out of the socket.
- Suture the flap closed using a Fine (1 metric) monofilament absorbable suture material with simple interrupted sutures ensuring that there is no tension on the sutures
Special Considerations for Feline Dentistry
Cats are not small dogs. Different pathology and different anatomy requires different skills to extract feline teeth. Perhaps the most common reason for extraction of feline teeth is due to the presence of a resorptive lesion. RL’s may be identified as either a type 1 (roots remain relatively unaffected by the resorption) or type 2 (replacement resorption of the roots with loss of the periodontal ligament, dentinal structure and root canal system of the root and replacement with bone). The type of the resorptive lesion can only be identified radiographically. It is important to know what type of lesion is affecting the tooth as the treatment options vary.
Crown Amputation for Type 2 Resorptive Lesions (pic21-27)
This technique is used when a tooth is undergoing resorption and there is no normal root structure remaining. This technique can only be used after a diagnosis of type 2 resorptive lesions has been made radiographically.
- Take a dental radiograph to confirm that the resorptive lesion is a type 2.
- Raise a small mucoperiosteal flap –use a no.11 scalpel blade to make the releasing incisions then a periosteal elevator to raise the flap.
- Use a small round bur to remove the crown of the tooth, sectioning the tooth just below the level of the alveolar bone, taking care not to damage the soft tissue on the lingual/palatal aspect of the tooth.
- The loose fragment can then be removed using an elevator.
- Smooth the alveolar bone margin using a large round diamond bur.
- Suture the flap closed using a monofilament absorbable suture material ensuring that there is no tension on the sutures.
Post-Operative Care
During the anaesthetic and immediately after the dental procedure the temperature of the pet should be monitored closely and warmth provided if needed as hypothermia is a major concern during extensive dental procedures. Good analgesia should be administered throughout and antibiotic cover should be given at the veterinary surgeons discretion.
The animal then needs to be monitored for any oral bleeding or epistaxis. A little blood-tinged saliva is normal but excessive haemorhage should be dealt with immediately by the veterinary surgeon.
The owner needs to be informed that there may be some bloody saliva from the mouth for the first 24 hours and gentle cleaning may be done with warm water or a saline solution.
Feeding post operatively is important and the animal should be encouraged to eat as soon as it is awake with a suitable post operative diet. Water should be available. If multiple extractions have been performed, soft food of a suitable calorific intake should be offered for the first 5 days. Usually the mouth should heal within the first week after which the pets’ usual diet may be resumed. If the pet has had a single extraction then its usual diet can be offered immediately after anaesthetic recovery.
A chlorhexidine mouthwash can be dispensed for the owner to use at home to help reduce plaque buildup whilst the mouth is healing. If no or few extractions were needed then tooth brushing can be instigated immediately.
| This article is still under construction. |