Difference between revisions of "Suture Materials"
m (moved Suture Materials and Patterns to Suture Materials) |
|||
| (11 intermediate revisions by 3 users not shown) | |||
| Line 1: | Line 1: | ||
| − | == | + | ==Suture Patterns== |
| − | + | Suture patterns are commonly classified as follows: | |
| + | *Appositional; these sutures hold the tissue in place in the normal anatomical alignment, such as with skin sutures. | ||
| + | *Inversion; these turn the edges of the wound inwards, for example when repairing intestinal anastamoses. | ||
| + | *Everting; these turn the edges of the wound outwards, and are useful to counteract sites where inversion of a wound may spontaneously occur, such as deep lacerations. In this situation an occasional everting sutures within a line of appositional sutures is useful. | ||
| − | == | + | Suture patterns are also commonly described according to the style of insertion. A few of the more common patterns are described below: |
| − | + | ==Simple Interrupted== | |
| + | [[Image:2000px-Simple interrupted suture.png|right|thumb|150px|<p>Horizontal Mattress Suture Pattern</p><sup>©Author: Olek Remesz(2007)Source: Wikipedia Commons</sup>]] | ||
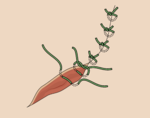
| + | This pattern apposes the wound edges with single sutures, knotted with square knots - 4 throws per knot are used for this style of suture. | ||
| + | The advantages of this style of suture are that tension can be adjusted for each suture, and if one suture fails, the damage is less likely to be catastrophic. The disadvantages are the time taken to insert individual sutures and the amount of suture material required. | ||
| − | + | ==Simple Continuous== | |
| − | + | This pattern is also an appositional pattern, where the suture material is knotted only at the beginning and end of the suture. The advantage of this technique is the reduced amount of suture material in contact with the wound, and an even tension is achieved along the wound. The main disadvantage of this pattern is the risk of complete wound breakdown if any part of the suture line becomes damaged during healing. Use 5 throws at the start of the suture and 6 throws to finish. | |
| − | |||
| − | |||
| − | |||
| − | |||
| − | |||
| − | == | + | ==Intradermal Insertion== |
| − | + | [[Image:2000px-Subcuticular_suture.png|left|thumb|150px|<p>Intradermal or Subcuticular Continuous Suture Pattern</p><sup>©Author: Olek Remesz(2007)Source: Wikipedia Commons</sup>]] | |
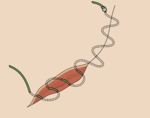
| − | + | Basic suture patterns can also be inserted intra dermally in order to reduce the amount of material on the external surface which is then vulnerable to interference by the patient. Intradermal sutures are well tolerated and have a pleasing cosmetic appearance, but are more time consuming to insert and require a little practise to do well. They can be a good solution to circumstances where post operative care will be impossible such as neutering of strays due for immediate release. | |
| − | |||
| − | |||
| − | |||
| − | == | + | ==Horizontal mattress== |
| − | Suture | + | [[Image:2000px-Horizontal_mattress_suture.png|right|thumb|150px|<p>Horizontal Mattress Suture Pattern</p><sup>©Author: Olek Remesz(2007)Source: Wikipedia Commons</sup>]] |
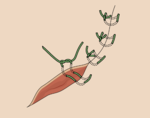
| + | Mattress style sutures have an everting pattern and are usually applied as single interrupted sutures with the knot placed away from the wound edge. Horizontal mattress sutures are placed so that the external suture material is aligned in parallel to the wound edge. | ||
| − | == | + | ==Vertical Mattress== |
| − | + | [[Image:2000px-Vertical mattress suture.png|left|thumb|150px|<p>Vertical Mattress Suture Pattern</p><sup>©Author: Olek Remesz(2007)Source: Wikipedia Commons</sup>]] | |
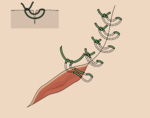
| + | Vertical mattress sutures are placed so that the external suture material is aligned at 90° to the wound edge. | ||
| − | + | There are many other styles of suture pattern used for specific surgeries such as orthopaedics. | |
| − | |||
| − | |||
| − | |||
| − | |||
| − | |||
| − | |||
| − | |||
| − | |||
| − | + | ==Suture Placement Practicalities== | |
| + | If you are right handed, close the wound from top to bottom or from right to left. If you are left handed, close the wound from top to bottom or from left to right. Drive the needle through the tissue by facing it away from your body and towards the wound, keeping the needle holder between your body and the wound at all times. To appose the tissue edges take separate bites from each side of the wound. Only ever handle the ends of suture material with surgical instruments as you will reduce the tensile strength in areas that have been handled by instruments. | ||
| − | + | Do not tie your sutures too tightly, as post op swelling can cause the sutures to ligate the tissue if they are not loose enough when inserted. Slide the knot away from the wound once you have tied it to reduce irritation to tissues post operatively. If, when you are placing sutures you discover that there is significant tension on the wound edges, a second deeper layer of closure is needed. | |
| − | |||
| − | |||
| − | |||
| − | |||
| − | |||
| − | |||
| − | |||
| − | |||
| − | |||
| − | |||
| − | |||
| − | |||
| − | |||
| − | |||
| − | |||
| − | |||
| − | |||
| − | |||
| − | |||
| − | |||
| − | |||
| − | |||
| − | |||
| − | |||
| − | |||
| − | |||
Revision as of 09:06, 26 October 2010
Suture Patterns
Suture patterns are commonly classified as follows:
- Appositional; these sutures hold the tissue in place in the normal anatomical alignment, such as with skin sutures.
- Inversion; these turn the edges of the wound inwards, for example when repairing intestinal anastamoses.
- Everting; these turn the edges of the wound outwards, and are useful to counteract sites where inversion of a wound may spontaneously occur, such as deep lacerations. In this situation an occasional everting sutures within a line of appositional sutures is useful.
Suture patterns are also commonly described according to the style of insertion. A few of the more common patterns are described below:
Simple Interrupted
This pattern apposes the wound edges with single sutures, knotted with square knots - 4 throws per knot are used for this style of suture. The advantages of this style of suture are that tension can be adjusted for each suture, and if one suture fails, the damage is less likely to be catastrophic. The disadvantages are the time taken to insert individual sutures and the amount of suture material required.
Simple Continuous
This pattern is also an appositional pattern, where the suture material is knotted only at the beginning and end of the suture. The advantage of this technique is the reduced amount of suture material in contact with the wound, and an even tension is achieved along the wound. The main disadvantage of this pattern is the risk of complete wound breakdown if any part of the suture line becomes damaged during healing. Use 5 throws at the start of the suture and 6 throws to finish.
Intradermal Insertion
Basic suture patterns can also be inserted intra dermally in order to reduce the amount of material on the external surface which is then vulnerable to interference by the patient. Intradermal sutures are well tolerated and have a pleasing cosmetic appearance, but are more time consuming to insert and require a little practise to do well. They can be a good solution to circumstances where post operative care will be impossible such as neutering of strays due for immediate release.
Horizontal mattress
Mattress style sutures have an everting pattern and are usually applied as single interrupted sutures with the knot placed away from the wound edge. Horizontal mattress sutures are placed so that the external suture material is aligned in parallel to the wound edge.
Vertical Mattress
Vertical mattress sutures are placed so that the external suture material is aligned at 90° to the wound edge.
There are many other styles of suture pattern used for specific surgeries such as orthopaedics.
Suture Placement Practicalities
If you are right handed, close the wound from top to bottom or from right to left. If you are left handed, close the wound from top to bottom or from left to right. Drive the needle through the tissue by facing it away from your body and towards the wound, keeping the needle holder between your body and the wound at all times. To appose the tissue edges take separate bites from each side of the wound. Only ever handle the ends of suture material with surgical instruments as you will reduce the tensile strength in areas that have been handled by instruments.
Do not tie your sutures too tightly, as post op swelling can cause the sutures to ligate the tissue if they are not loose enough when inserted. Slide the knot away from the wound once you have tied it to reduce irritation to tissues post operatively. If, when you are placing sutures you discover that there is significant tension on the wound edges, a second deeper layer of closure is needed.


