Difference between revisions of "Help:Books"
(included link to how-to video) |
|||
| (19 intermediate revisions by 2 users not shown) | |||
| Line 1: | Line 1: | ||
| − | Creating a book allows you to collect several WikiVet pages together and package them in an attractive PDF format. Image and article information, as well as references and licensing information, | + | [[File:Book.gif|right|100px]] |
| + | ==About== | ||
| + | Creating a book allows you to collect several WikiVet pages together and package them in an attractive PDF format. Image and article information, as well as references and licensing information, are all collated automatically. You can create chapters in order to organise the pages as you see fit and the books can be saved and/or printed. | ||
| + | |||
| + | PDF generated using the open source mwlib toolkit. See [http://code.pediapress.com/ http://code.pediapress.com/] for more information. | ||
| + | <br><br> | ||
| + | <big>'''[[Video: How to use PDF book creator|View the how-to video]]'''</big> | ||
| + | <br> | ||
==How-to== | ==How-to== | ||
| Line 9: | Line 16: | ||
|'''Selecting 'Create a book' ''' | |'''Selecting 'Create a book' ''' | ||
|[[File:Createabook2.jpg|thumb|left|150px| Click on 'Create a book' ]] | |[[File:Createabook2.jpg|thumb|left|150px| Click on 'Create a book' ]] | ||
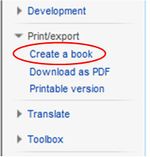
| − | |On any content page, you should see the print/export | + | |On any content page, you should see the print/export tab on the left-hand-side of your screen. It should be found just above the 'translate' tab and below the 'development' tab. Click on the tap to expand it, then click on the top option - ''' 'Create a book' '''. |
|- | |- | ||
|'''Start book creator''' | |'''Start book creator''' | ||
|[[File:Startbookcreator.jpg|thumb|left|300px| Click on 'Start book creator' ]] | |[[File:Startbookcreator.jpg|thumb|left|300px| Click on 'Start book creator' ]] | ||
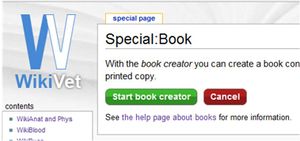
| − | |You should be taken to a page that explains you are about to use the book creator. Click on the green button that says 'Start book creator' | + | |You should be taken to a page that explains you are about to use the book creator. Click on the green button that says ''' 'Start book creator' '''. |
|- | |- | ||
|'''Adding and removing pages from your book''' | |'''Adding and removing pages from your book''' | ||
|[[File:Addpagetobook.jpg|thumb|left|300px| 'Add this page to your book' circled in red ]] | |[[File:Addpagetobook.jpg|thumb|left|300px| 'Add this page to your book' circled in red ]] | ||
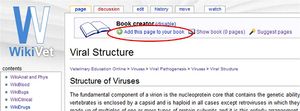
| − | |You should notice an extra box has appeared at the top of your screen with several options on it. To add pages to your book, you need to get to the page you want to add (either by searching or browsing), then click on the 'Add this page to your book' link at the top of your screen. Once it has been added, that link should change to a 'Remove this page from your book' link. This allows you to remove the page if you have changed your mind. | + | |You should notice an extra box has appeared at the top of your screen with several options on it. To add pages to your book, you need to get to the page you want to add (either by searching or browsing), then click on the ''' 'Add this page to your book' ''' link at the top of your screen. Once it has been added, that link should change to a 'Remove this page from your book' link. This allows you to remove the page if you have changed your mind. When you are happy that you have all the pages you want, click on ''' 'show book' '''. |
| − | |||
| − | |||
| − | |||
| − | |||
| − | |||
| − | |||
| − | |||
| − | |||
| − | |||
| − | |||
| − | |||
| − | |||
|- | |- | ||
| − | | | + | |'''Manage your book''' |
| − | | | + | |[[File:Managebook.jpg|thumb|left|300px| 'Manage your book' screen ]] |
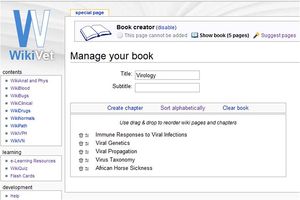
| − | | | + | |Once you've clicked on 'show book', you're able to give the book a title (and subtitle if desired). You can '''change the order of pages''' by dragging and dropping them into the correct order. You can also '''create chapters''' if desired. When you're happy with the layout of your book, click on ''' 'Download as PDF' ''' which is on the right-hand-side of the screen. If you don't want to proceed, you can get rid of the book and '''start again''' by clicking on ''' 'clear book' '''. |
|- | |- | ||
| − | |''' | + | |'''Download your book''' |
| − | | | + | |[[File:Downloadfile.jpg|thumb|left|300px| 'Download your file' link circled in red ]] |
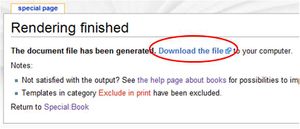
| − | | | + | |Once the PDF has rendered, a new screen will appear (pictured left). If you click on the ''' 'Download the file' ''' link your book will open in a new window. To '''save the book''' you must view it, right-click on the screen then click 'save as' and find a location for it on your computer. The book will be saved as an Adobe Acrobat Document. Alternatively you can '''print the book''' straight away - to do this simply right-click then click on 'print'. |
|- | |- | ||
|} | |} | ||
Latest revision as of 18:15, 13 March 2012
About
Creating a book allows you to collect several WikiVet pages together and package them in an attractive PDF format. Image and article information, as well as references and licensing information, are all collated automatically. You can create chapters in order to organise the pages as you see fit and the books can be saved and/or printed.
PDF generated using the open source mwlib toolkit. See http://code.pediapress.com/ for more information.
View the how-to video
How-to
| Action | Image | How? |
| Selecting 'Create a book' | On any content page, you should see the print/export tab on the left-hand-side of your screen. It should be found just above the 'translate' tab and below the 'development' tab. Click on the tap to expand it, then click on the top option - 'Create a book' . | |
| Start book creator | You should be taken to a page that explains you are about to use the book creator. Click on the green button that says 'Start book creator' . | |
| Adding and removing pages from your book | You should notice an extra box has appeared at the top of your screen with several options on it. To add pages to your book, you need to get to the page you want to add (either by searching or browsing), then click on the 'Add this page to your book' link at the top of your screen. Once it has been added, that link should change to a 'Remove this page from your book' link. This allows you to remove the page if you have changed your mind. When you are happy that you have all the pages you want, click on 'show book' . | |
| Manage your book | Once you've clicked on 'show book', you're able to give the book a title (and subtitle if desired). You can change the order of pages by dragging and dropping them into the correct order. You can also create chapters if desired. When you're happy with the layout of your book, click on 'Download as PDF' which is on the right-hand-side of the screen. If you don't want to proceed, you can get rid of the book and start again by clicking on 'clear book' . | |
| Download your book | Once the PDF has rendered, a new screen will appear (pictured left). If you click on the 'Download the file' link your book will open in a new window. To save the book you must view it, right-click on the screen then click 'save as' and find a location for it on your computer. The book will be saved as an Adobe Acrobat Document. Alternatively you can print the book straight away - to do this simply right-click then click on 'print'. |

