Help:Updating Previous Content Maps
|
|
| What are content maps? | 1. Creating a Content Map | 2. Using Content Map Converter | 3. Uploading a Content Map | 4. Updating Previous Content Maps | All Content Maps on WikiVet |
|---|
On WikiVet Content Maps already exist and there is no requirement for a new Content Map. However the existing Content Map is often out of date and needs to be updated. Rather than creating a whole new Content Map it is better to download the files associated with the Content Map that needs updating and simply modify the existing Content Map. This page will detail how to do this but assumes a level of competency with steps 1, 2 and 3 for creating Content Maps.
Obtaining the CMap files
- Visit the page that contains the Content Map that needs updating
- Click
 in the bottom left corner of the Content Map to go to the Content Map image's page
 - In the image description their should be a link to the files required for that Content Map, click it
- In the files description click 'Download This Folder' and save the in an appropriate location (i.e. 'My Cmaps' folder in the 'My Documents/Documents' folder)
- Extract the files from the folder by right clicking th compressed folder and selecting 'Extract All'
- Follow the steps in the extraction wizard (usually just keep clicking next until it finishes)
- If not already move the extracted folder into the 'My CMaps' folder in 'My Documents/Documents' folder
Updating the Content Map
- Open the CMapTools program and then open the Content Map
- Modify the the Content Map (see step 1 for creating links and exporting the modified Content Map
- Follow Step 2
- Navigate to the page that contains the Content Map that is being updated and click 'edit'
- Simply replace the existing code from
<imagemap>down to</imagemap>inclusieve with the new code that has been created - Click 'Save Page'
- Simply replace the existing code from
- Now click
 in the bottom left hand corner to go to the image's page
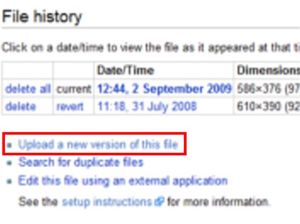
- On this page located and click the link 'Upload a new version of this file'
- Select the new Content Map image that has been created by clicking the 'Browse button'
- Follow the prompts and select 'Ignore and save file anyway' when prompted about a file overwrite
- On the image's page (now updated) click the link to go to the Content Map's compressed file
- On the compressed file page again locate and click 'Upload a new version of this file'
- Select the new Content Map compressed folder (.zip file) that has been created by clicking the 'Browse button'
- For information on how to create a compressed file of the Content Map files view step 1-4 under 'Uploading the Content Map Files for other users' from step 3.
- Again follow the prompts and select 'Ignore and save file anyway' when prompted about a file overwrite
- The Content Map and all its associated files have now been updated
