Difference between revisions of "CMapTools"
m |
|||
| Line 7: | Line 7: | ||
==Creating the links== | ==Creating the links== | ||
<p>1. On the topic right hand click the label and select ‘Add web address’.</p> | <p>1. On the topic right hand click the label and select ‘Add web address’.</p> | ||
| − | [[Image:Create Link 1.jpg| | + | [[Image:Create Link 1.jpg|300px]] |
<p>2. In the dialog box put your wikivet page name into the ‘Resource name box’ and Web address’ box and click ‘Ok’.</p> | <p>2. In the dialog box put your wikivet page name into the ‘Resource name box’ and Web address’ box and click ‘Ok’.</p> | ||
| − | [[Image:Create Link 2.jpg| | + | [[Image:Create Link 2.jpg|320px]] |
<p>3. Do this for all the labels on your map.</p> | <p>3. Do this for all the labels on your map.</p> | ||
| Line 28: | Line 28: | ||
==Creating the interactive map== | ==Creating the interactive map== | ||
| − | *Now use the Content Map Converter software | + | *Now use the [[Content Map Converter|Content Map Converter software]] |
| − | *Click here for instructions | + | *Click [[Content Map Converter#|here]] for instructions |
Revision as of 14:53, 28 July 2008
This page includes details on how to obtain CmapTools software and instructions on how to create a web page in order to produce an interactive content map for wikivet.
Downloading CMapTools software
CMapTools software can be downloaded here.
Creating the content map
Follow the instructions in the CMap software
Creating the links
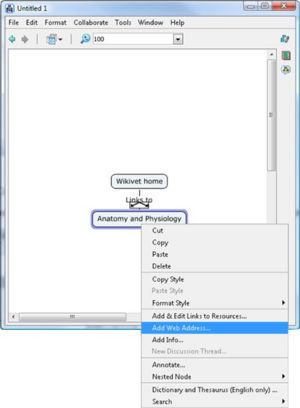
1. On the topic right hand click the label and select ‘Add web address’.
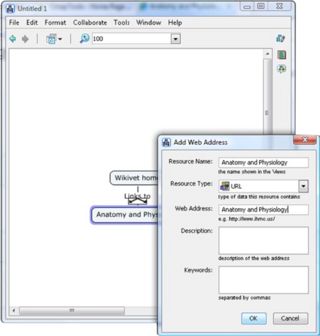
2. In the dialog box put your wikivet page name into the ‘Resource name box’ and Web address’ box and click ‘Ok’.
3. Do this for all the labels on your map.
Export Cmap as a Web Page
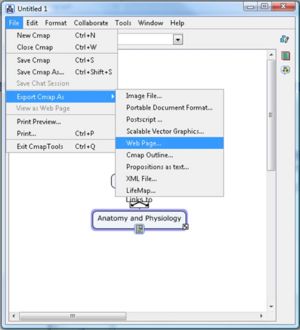
From an open Cmap : 1. Click File, then Export Cmap As, then Web Page...
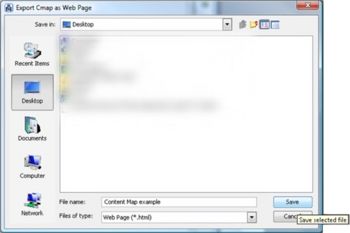
2. You will now see the "Export Cmap as Web Page" window.
- The file name will default to the name of your Cmap.
- Choose the location on your computer to save the web page to.
- Click Save when ready.
3. Your Cmap has now been saved as a web page on your computer in the location you specified. There will be three files in the location.
- The .html file with the name specified in the Save window
- A .jpg file, this is the image of the Cmap
- CmapToolsTrademark.gif, this is IHMC's trademark image. (This image is not required)
Creating the interactive map
- Now use the Content Map Converter software
- Click here for instructions


